Magnetic Slime….it moves….it slides…..it gobbles up magnets…….this slime is alive!!
Slime Science fun at home making magnetic slime. Read on to find out how to make magnetic slime & watch the video too…..
I was really pleased to be able to make our own Magnetic Slime which has lasted ages! Much better than buying it….did you read all the publicity about some magnetic slimes being toxic, and recalled? Well, making your own means you know exactly what goes in it and none of the ingredients we use are toxic!
So lets get sliming, or should that be smiling?! Smiling-Sliming…..sorry, lets crack on with this…..
If you have never made slime before, you should read this blog to help you get to know the basics of slime making…..
materials
- A bowl
- A stirrer/spatula
- White PVA glue
- Food colouring *optional, see lab notes below!
- Activator – We now sell ready to use slime activator in our shop too.
- Pipette
- Magnetite, either as a powder or as granules * see lab notes below. WARNING: powder can cause respiratory & eye irritation, read this safety guide.
- Neodymium magnets (regular ones are not strong enough) – WARNING: potentially lethal if swallowed, read this safety guide.
- Gloves & goggles
This is how I made the magnetic slime………
method
First I protected the work surfaces!
I then made a batch of blue slime by adding a large slosh of glue to the bowl and stirring in the blue food colouring. Once I was happy I’d mixed it in well enough and liked the shade of colour, I started to add my borax solution using a pipette. I mixed the slime each time I squirted in a squirt of borax and continued to do this until the forming slime started to pull away from the sides of the bowl. When it reached this point I grabbed the slime into my hands for final moulding, stretching and squishing by hand. This manual mixing is the last and important stage of slime-making and although messy to start with, as the slime forms it comes off my hands and gets less sticky. If it remains sticky and it still a mess all over my hands, I just squirt a bit of borax solution directly into my hands and mix it in to fix this.
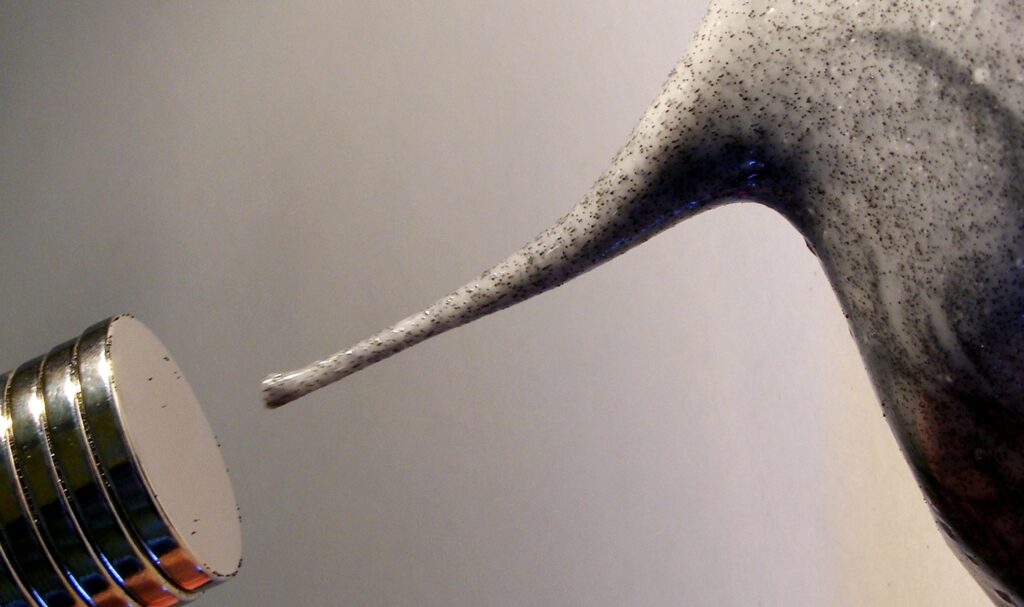
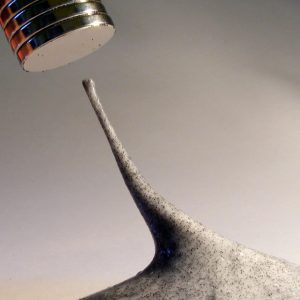
Next I sprinkled a large quantity of magnetite onto my slime and folded it in really well. I tested my slime and decided to add another sprinkling to make my slime more magnetic.
Magnetic Slime finished!! Playtime!!!
We played with the slime using our neodymium magnets for ages, it was creepy – but fun.
…..and I now routinely demonstrate my magnetic slime at our slime workshops and parties. The slime I make are stored in lidded plastic tubs and last ages this way.

lab notes
Magnetite – powder or grains?
I’ve tried both and found that the powder changed the colour of my slime, so the blue looked dirty grey with powdered magnetite, but as you can see in the video the larger grains enabled the slime colour to be visible.
Rust!!
I discovered that in some of the slimes I made the iron oxide started to rust, and the slime was ruined. To avoid this happening to you I recommend adding no colour to the slime, just make a white slime and add your magnetite to that (it turns grey). We have brilliant non-rusting, grey-coloured magnetic slime that has lasted months.
Activator?
you can read more about activator, what it is and what is does, by going to our blog here.
We now sell ready to use slime activator in our shop too. We have been making our own slime activator for our workshops and parties for over 10 years now and its is strong, reliable, and safe. Grab your bottle now and happy sliming!
Want more slime recipes?
Check out our other How To blogs here:
Colour-changing thermochromic slime
Fluorescent/Hallowe’en slime
Fluffy slime
Good luck & happy sliming
If you tackle this activity at home you do so at your own risk. If you have as much fun as we did, feel free to share your pictures with us on Facebook.
Bye for now
Ruth
Chief Scientist at Devon Science